
Why Your Emails Keep Going to Spam And How To fix it

My clients are not receiving my emails!
As a professional photographer, I use a lot of different software to make my life easier. Personally, I use Dubsado to keep track of my clients & projects, and Pic-Time to deliver client galleries. These tools send emails on my behalf; it’s really important that clients receive those emails! For the longest time, I was struggling with my emails not being delivered. Sometimes they would land in junk or spam, and other times they wouldn’t be delivered at all. It was really frustrating.
I brought the issue up to my partner, who is a software engineer, and she helped me fix the problem once and for all! Whether you use Dubsado, Honeybook, Pic-Time, Pixieset, ShootProof or some other tool; the concept is the same.
Why Your Emails Keep Going To Spam
It’s a feature, not a bug
I know it doesn’t feel like it, because it’s so frustrating – but this is happening because email providers are trying to keep you safe. Basically, you need to tell your server that yes, I trust these services, and they are allowed to send emails on my behalf. Without these protections in place, random cybercriminals could impersonate you in their emails – which is not something you want!
No worries though – it’s a relatively easy fix. Soon enough, your emails won’t be relegated to your client’s junk folders.
Step 1: Access your DNS Settings
DNS stands for Domain Name Settings. So, first things first – you need to know where your domain is hosted. It might be GoDaddy, SquareSpace, Bluehost, or something else. Regardless of where your domain is hosted, the same general rules apply. You need to figure out where you manage your DNS records.
Here are some guides to finding your DNS records on some of the more popular hosting sites:
If your host isn’t listed here, don’t worry! Just google “<YOUR HOST NAME HERE> DNS settings” and you should be able to find a guide.
Step 2: MAke a List Of Allowed Domains
Your email host
This is the most important record. If you use Gmail, for example, this rule says that “Gmail is allowed to send emails on behalf of stephdonaherphotography.com”. Adding this one record should solve MOST of your problems – this is all that I needed to fix Dubsado, and should also work for Honeybook.
Gmail: _spf.google.com
Microsoft Outlook: spf.protection.outlook.com
Godaddy: secureserver.net
if you don’t see your email host listed here, you’ll have to contact yours to get their SPF value.
other tools
Here are some SPF values for other commonly used tools:
Pic-Time: sendgrid.net AND we@pic-time.com
17Hats: sendgrid.net
Zoho CRM: transmail.net
HubSpot: Hubspot provides a record you can copy. See instructions here.
PhotoBiz: emailsrvr.com
ShootProof: spf.shootproof.com
Write down all the allowed domains that you need – for me, it was Gmail and Pic-Time. We’ll use them in the next step.
Step 3: Create an SPF Record
“SPF” isn’t actually referring to sunscreen here – it stands for Sender Policy Framework. This is a rule that you add to your domain that says “these websites are allowed to send emails on my behalf”.
Go to your DNS settings as explained in Step 1. You should see some kind of table – it’ll look a little different depending on your host, but it should look something like this:

You need to add a new TXT record. Find a button that lets you create a new record. You need to add the following:
Host/Name: @
Type: TXT
The Value is going to be composed of all of the allowed domains you listed in Step 2. First of all, it needs to start with v=spf1 ; this tells your domain that you’re creating an SPF record. Then for every domain, you need to add include:<DOMAIN> like this:
v=spf1 include:<DOMAIN1> include:<DOMAIN2> include:<DOMAIN3> ~all
This is an example SPF record that allows Gmail and Pic-Time:
v=spf1 include:_spf.google.com include:sendgrid.net include:pic-time.com ~all
This is an SPF record that allows Microsoft Outlook only:
v=spf1 include: spf.protection.outlook.com ~all
The ~all at the end says “allow mail from other domains, but treat it as suspicious”. If you prefer, you can change it to -all which says “do not allow mail from other domains” – I do not recommend this. Save your new record and go on to the next step.
I already have an spf record!
If there’s already an SPF record in your DNS settings (you’ll know if any of them start with v=spf1), that’s okay! Just edit it to add the extra domains – make sure the ~all tag is the last thing there.
Step 4:Create a DMARC Record
Sorry for all the technical babble! We’re almost done. Next, you have to create a DMARC record. The DMARC record tells your recipient “this is what you should do if my email fails authentication (you aren’t sure I am who I say)”. For more information about DMARC, click here.
First of all, you should know that once you add a DMARC record, you will start receiving emails with reports whenever you send an email that fails authentication. You can create a new email address to receive these reports, or you can send them to your regular email – either way, you need an email on your domain. If you’re going to create a new email address, I recommend using something like dmarc@yourwebsite.com
Create a new DNS record with the following:
Host/Name: _dmarc
Type: TXT
The value should look like this:
v=DMARC1; p=none; rua=mailto:dmarc@yourwebsite.com
v=DMARC1 says that “this is a DMARC record”. p=none is the policy that says “Accept this email even if authentication fails”, and rua tells the recipient where to report the failure. Replace dmarc@yourwebsite.com with the email address where you want to receive reports, and save your record.

Step 5: Check your Spam Score
If you never had DMARC and SPF records in the past, it’s possible that your emails have been reported as spam, which can affect your email deliverability. To check your spam score, I recommend using Mail Tester.
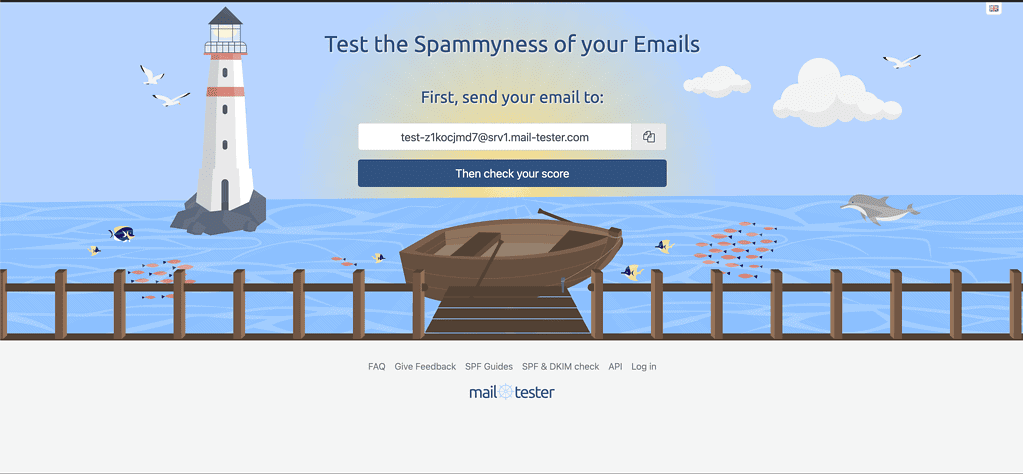
Copy the email that they give you, and send a test email. If you were having issues with Dubsado or Honeybook, you should create a fake client using this address and send them an email. I recommend using an email template that you know has had issues in the past; Mail Tester will tell you exactly what kind of problems there are and how to fix them.